Field Manuals How To Start The Machine Lesson V
Invite The Team
Bring admins, managers, and reps into Moneyball, then connect each person to the right sales data.
Part I
Now Bring In The Humans
Moneyball is configured. The data has been mapped. The discovered values have been categorized. Now it is time to invite the people who will actually use the thing: admins, managers, and reps. Do not forget the reps. They tend to notice.
Moneyball can uncover a lot of useful signals, but the team setup determines who can access the workspace, who can manage the setup, which managers can see which reps, and which Moneyball user belongs to which sales rep record from your CRM or spreadsheet.
Open Admin → Team.
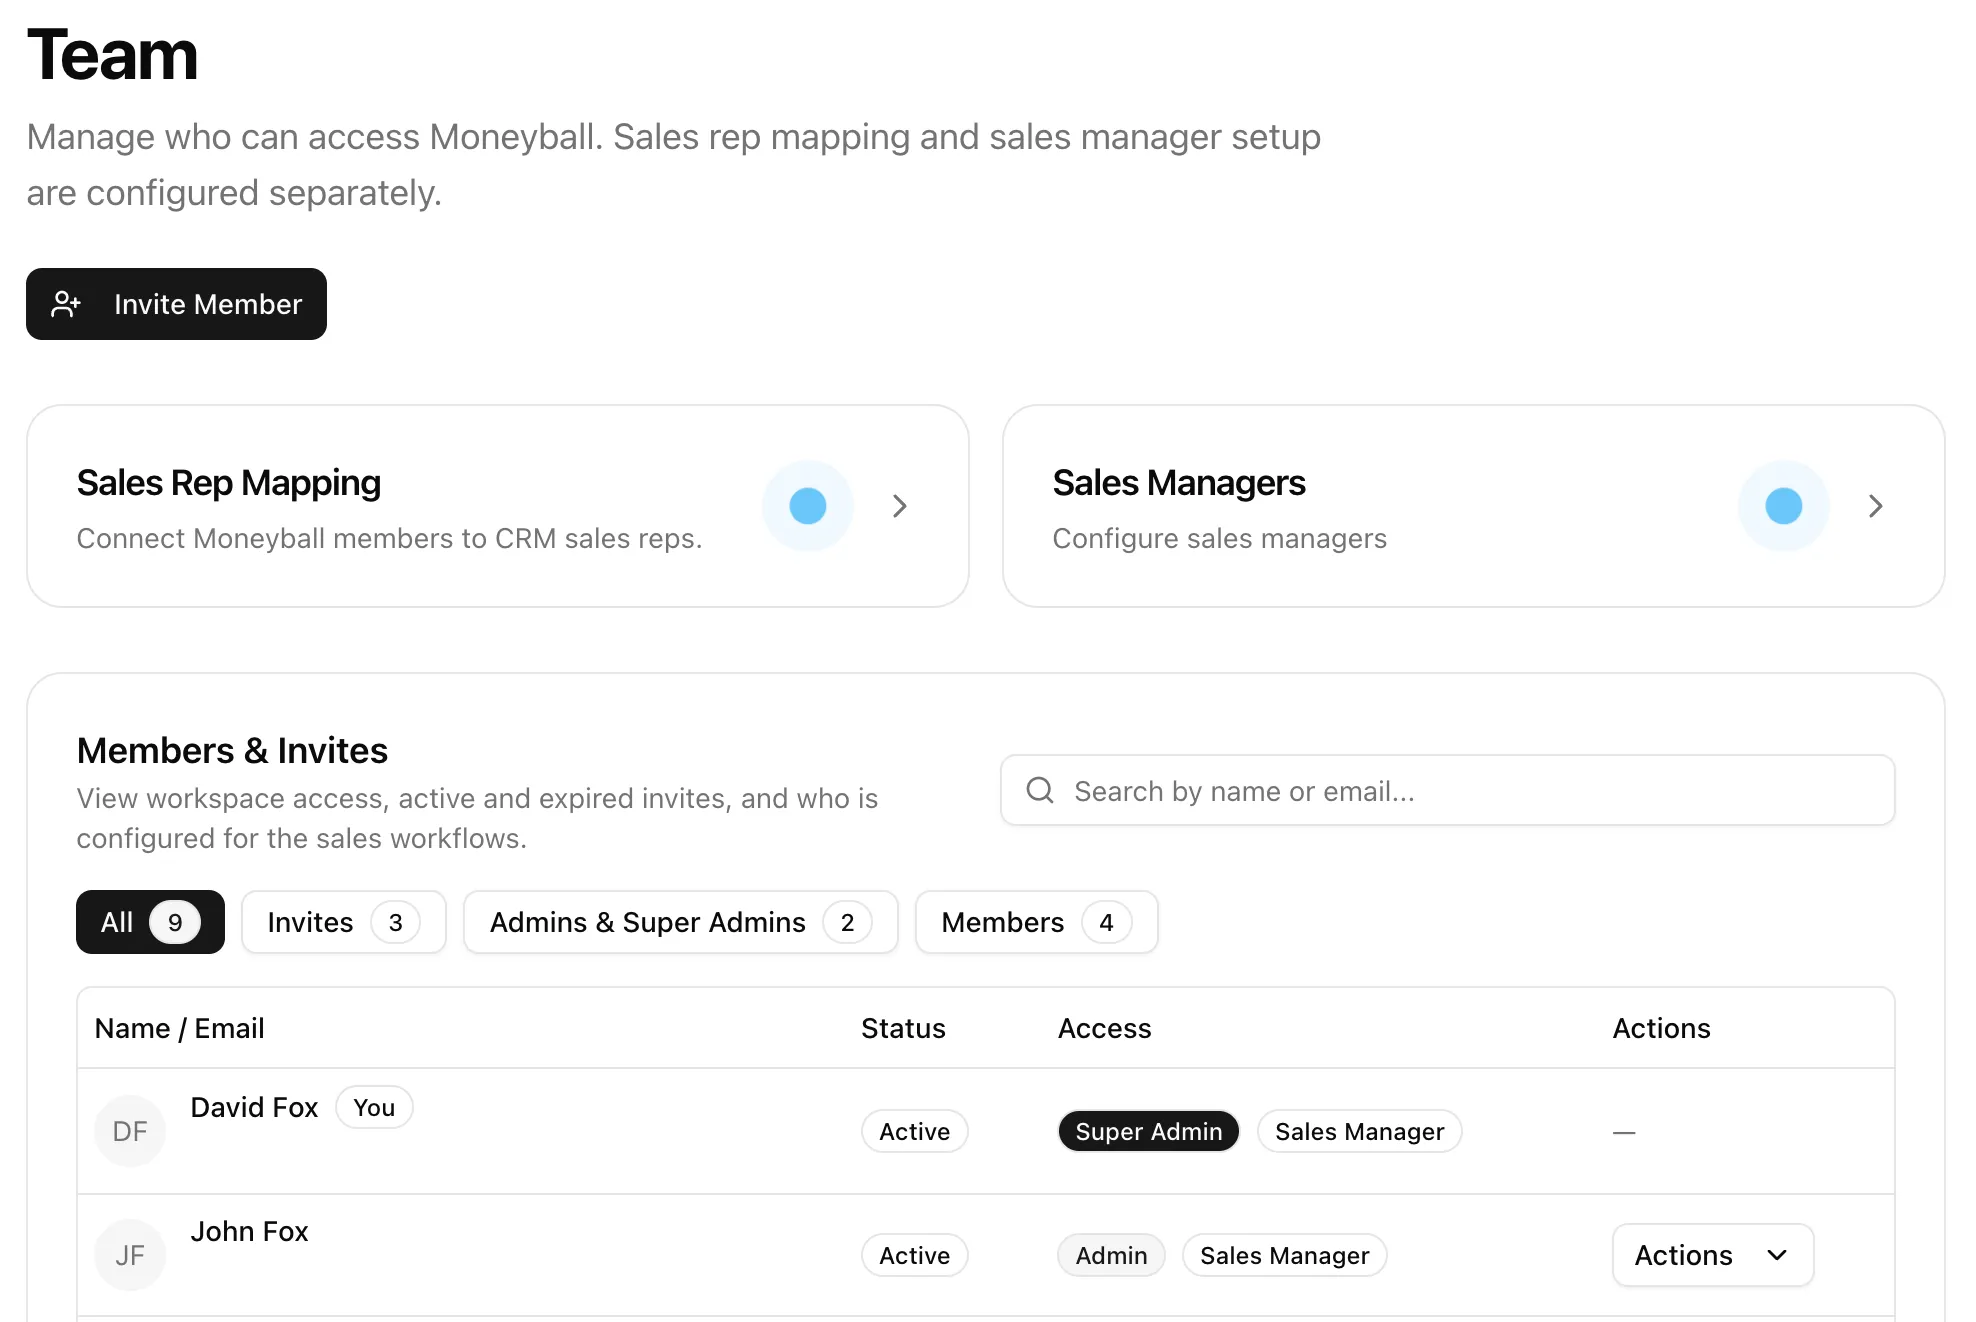
This page has three jobs:
- Invite Member. Add people to the Moneyball workspace.
- Sales Rep Mapping. Connect Moneyball users to the sales reps Moneyball found in your source data.
- Sales Managers. Define which reps each manager can view throughout Moneyball.
The table below those cards shows active members, pending invites, expired invites, admins, super admins, and regular members.
Part II
Understand Admins, Managers, And Members
Before inviting everyone, it helps to separate a few ideas.
Super Admins are the highest-access users in the organization. They can manage sensitive organization settings and admin access. Be careful with this role. Handing out Super Admin like Halloween candy is how software gets haunted.
Admins can access the Admin area and manage most of the Moneyball setup. If a user is not an admin, the Admin panel does not appear for them inside the application.
Members can use Moneyball without access to admin controls.
Sales managers and sales reps tend to simply be Members. They do not need to be admins. If you want managers and reps to use Moneyball without giving them the controls that alter the setup, that is not only allowed. It is very reasonable.
Part III
Invite And Manage Team Members
To invite someone, click Invite Member from the Team page.
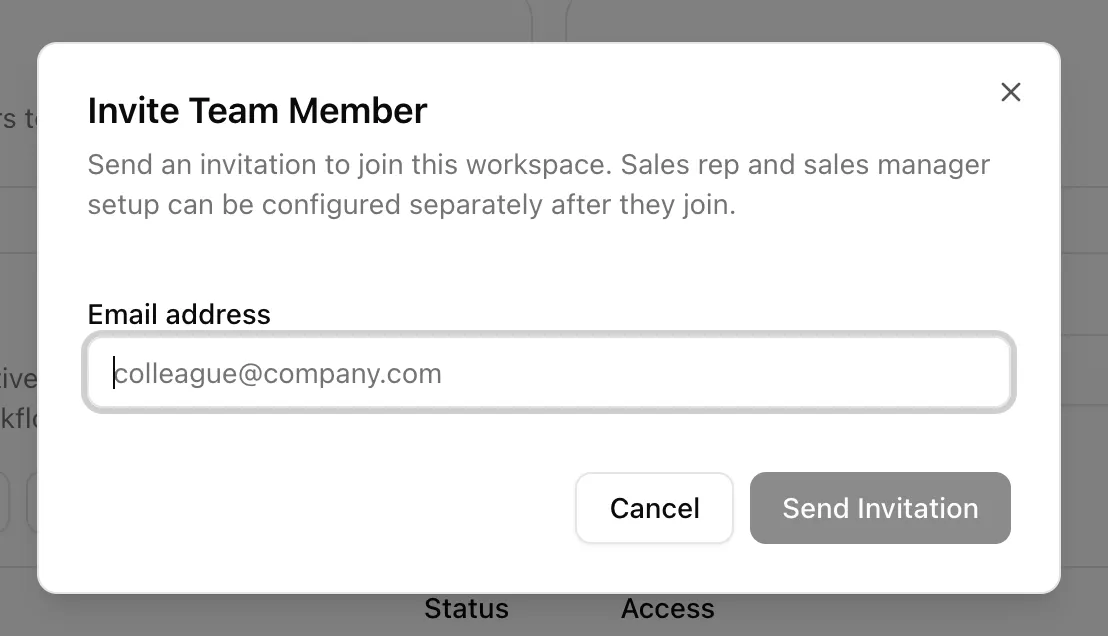
Enter the person’s email address and send the invitation. They will receive an email inviting them to join the workspace. If they do not see it, ask them to check spam. This is not glamorous advice, but it has saved many minutes of ceremonial confusion.
Invited users appear in the Members & Invites table. Once they accept, they appear as active members.
Use the filters to view all people, invitations, admins and super admins, or members. The search box is useful once the table gets crowded.
The Actions menu lets you manage an existing member.
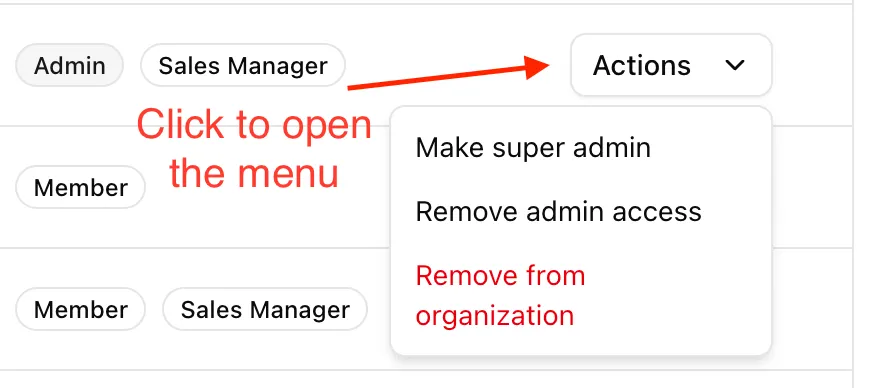
Depending on your own access level and the user you are editing, actions may include:
- making someone an admin,
- making someone a super admin,
- removing admin access,
- removing someone from the organization,
- resending an invitation,
- or revoking an invitation.
Pending invitations can expire if they sit untouched for long enough. If that happens, resend the invite or revoke it and start over.
Part IV
Configure Sales Managers
Next let us move on to sales managers: the folks who keep the machine running and the sales reps from running amok.
- Invite The Manager First
Invite the person who will be in this role and have them accept the invitation. Once they have accepted, open Sales Managers from the Team page. Upon doing so, you will see a screen similar to this:
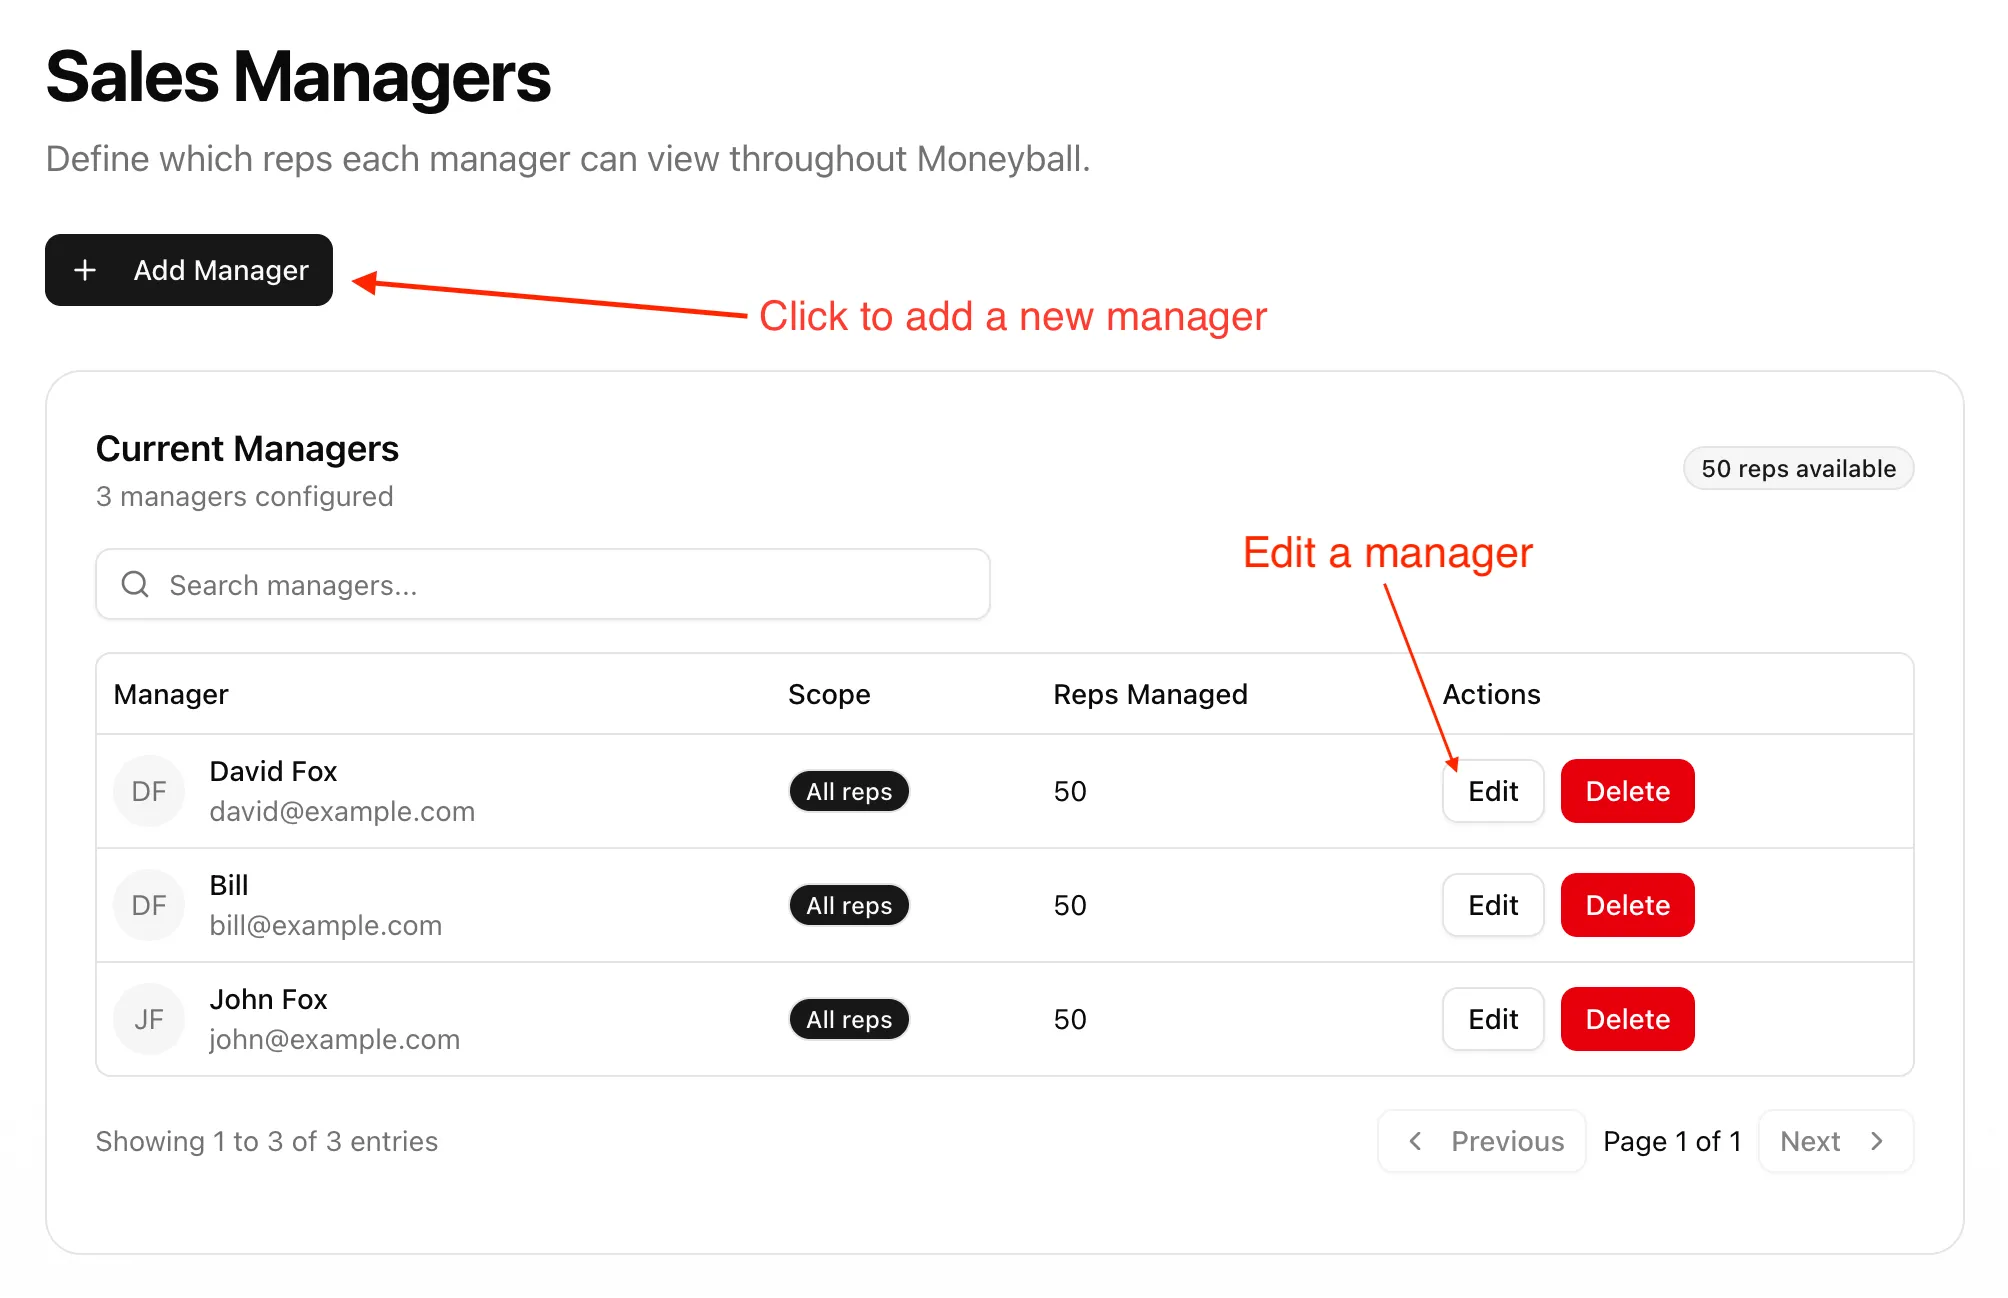
- Add The Manager
Click Add Manager. Moneyball will then ask you to select the user who should become a sales manager.
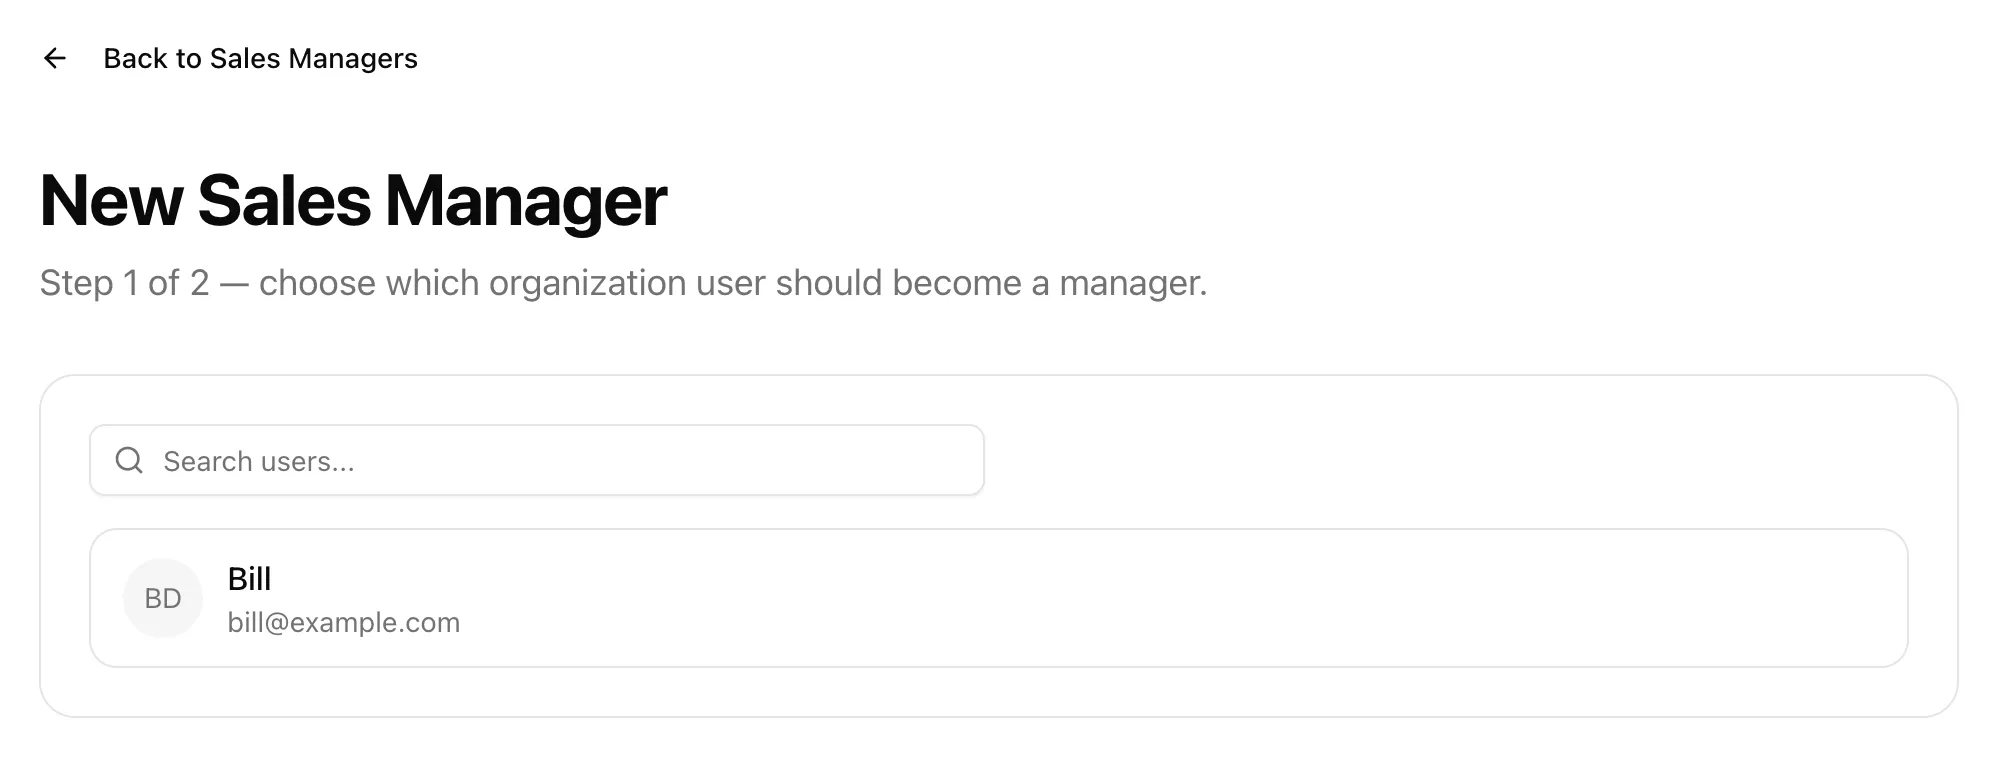
- Choose Their Scope
Choose the user, then set the manager’s scope.
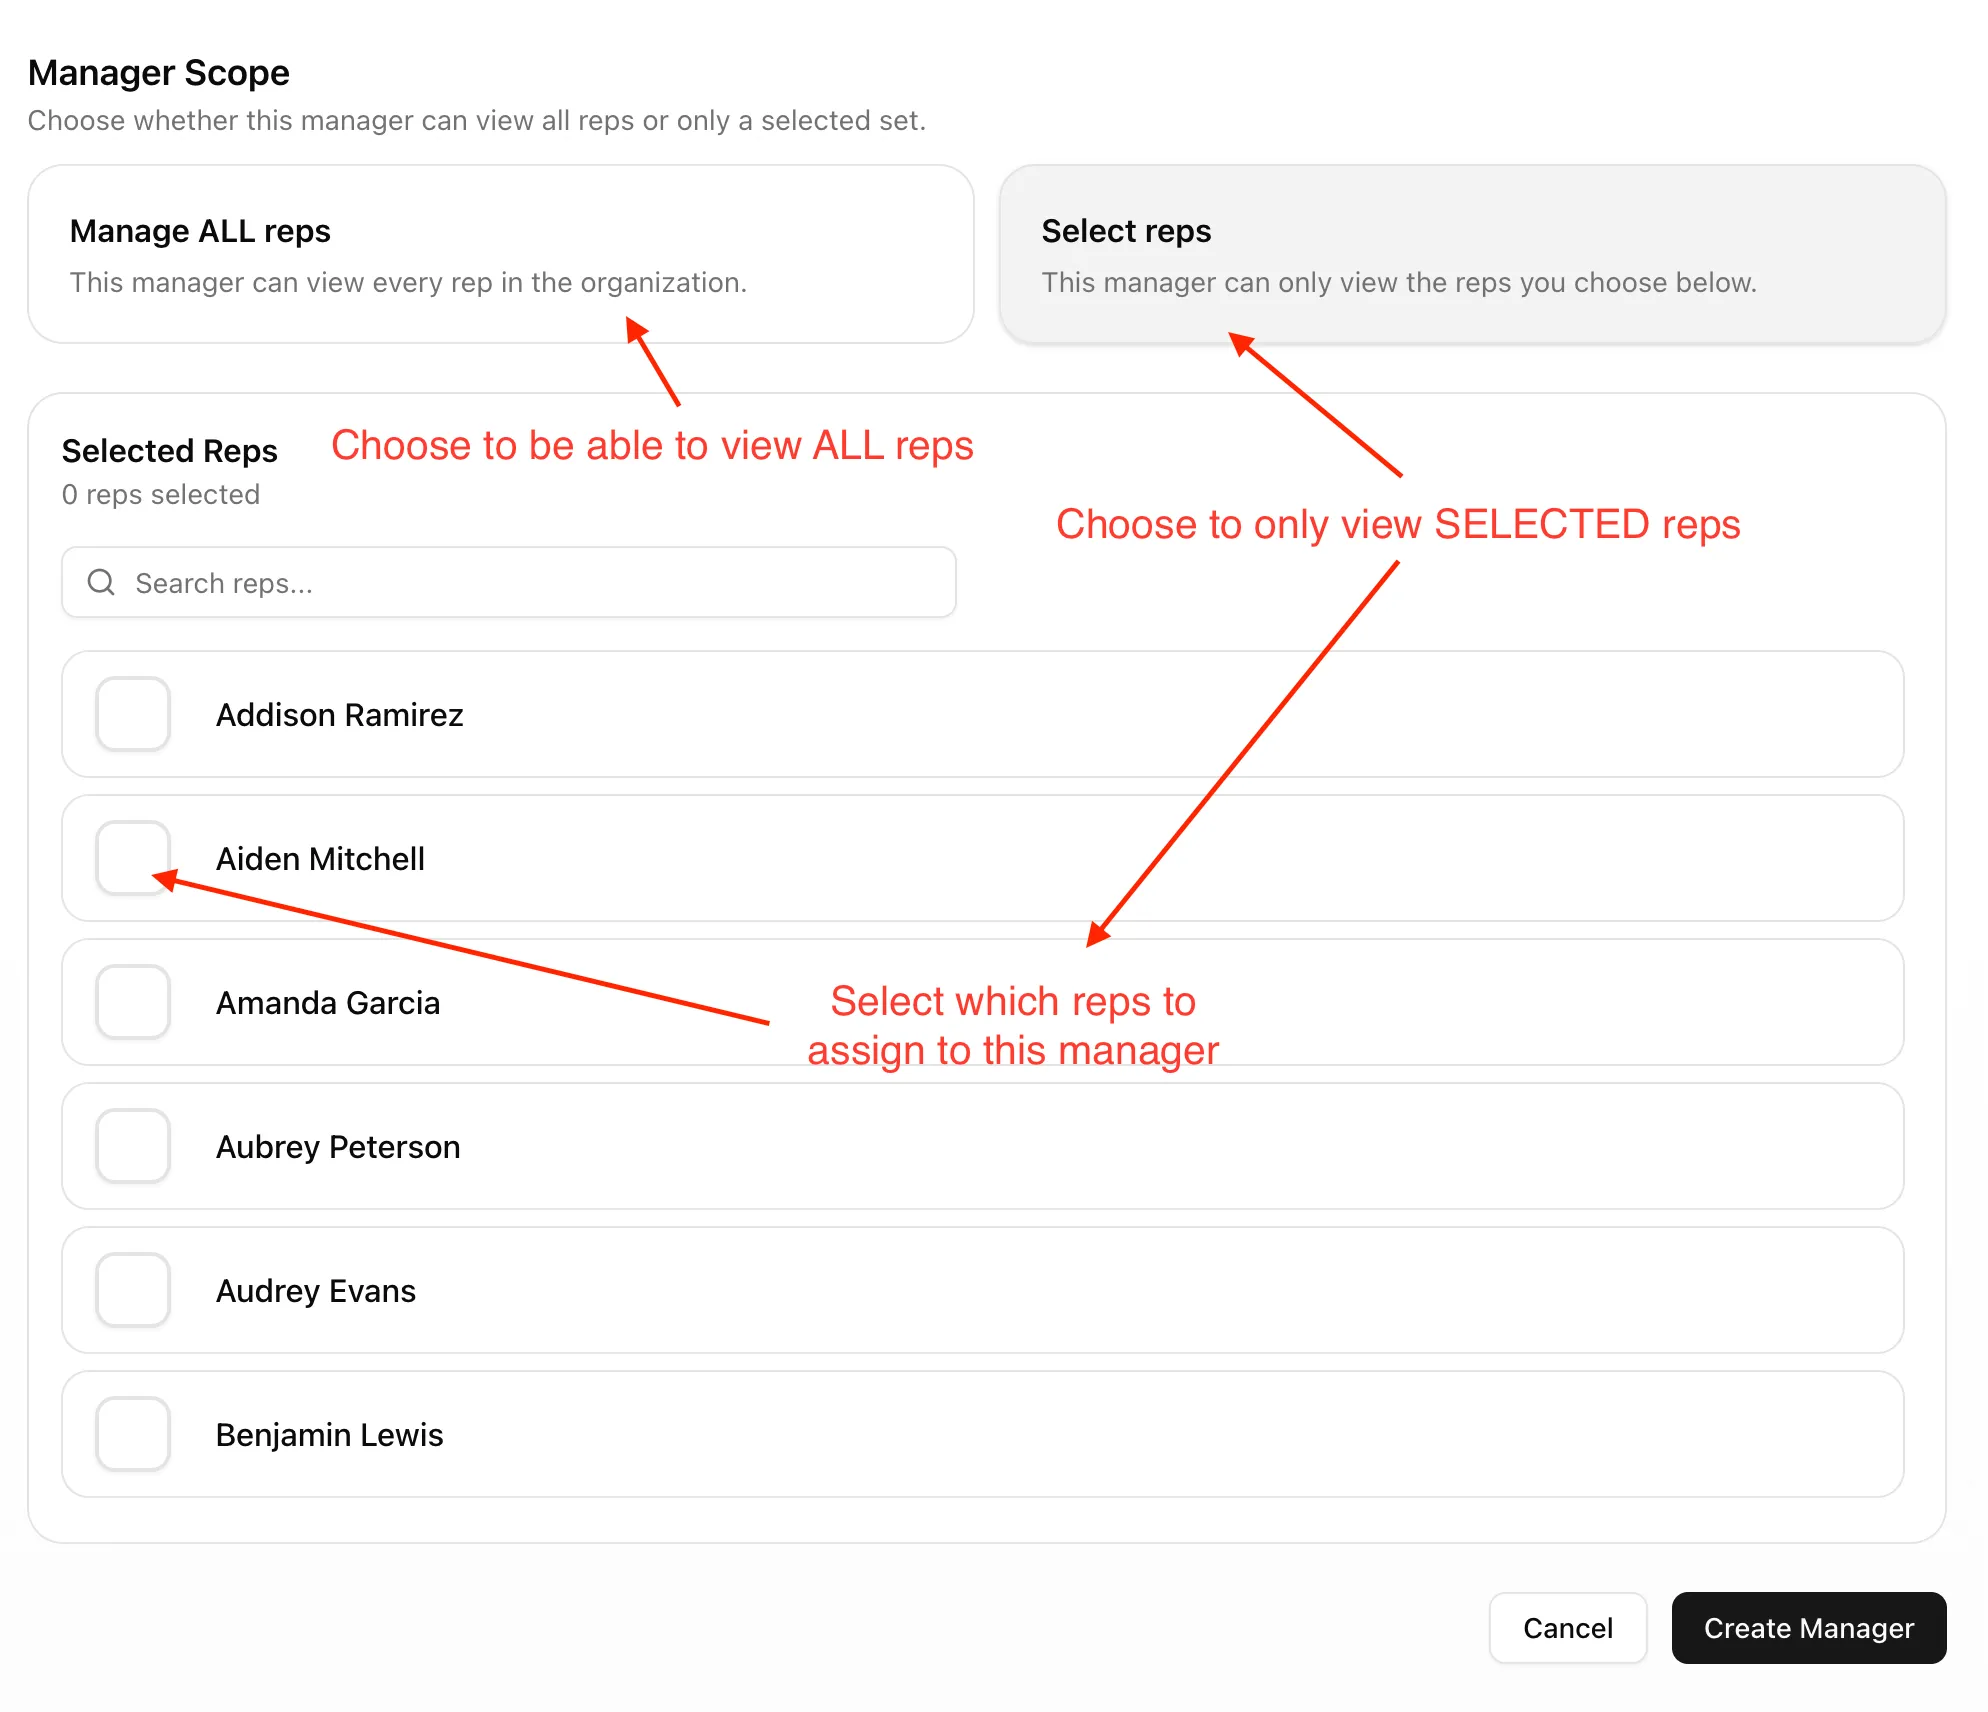
You have two options: Manage ALL reps, where the manager can view every rep in the organization, or Select reps, where the manager can only view the reps you choose. If you choose selected reps, search or scroll through the rep list and check the reps this manager should oversee. Then create the manager.
You can return to the Sales Managers page later to edit a manager’s scope or remove a manager configuration.
Part V
Link Users To Sales Reps
Now for one last bit of wiring.
Moneyball has two things that sound similar but are not the same: Moneyball users, meaning the people who log in to Moneyball, and sales rep records, meaning the reps Moneyball found in your CRM or spreadsheet data.
Sales Rep Mapping is where you tell Moneyball, “this Moneyball user is this sales rep from our data.” That mapping helps the right person see the right rep data and helps managers view the people they are meant to manage.
- Open Sales Rep Mapping
Open Sales Rep Mapping from the Team page. The left side lists Moneyball users and pending invitations that are not yet linked. The right side lists sales reps Moneyball found in your data source.
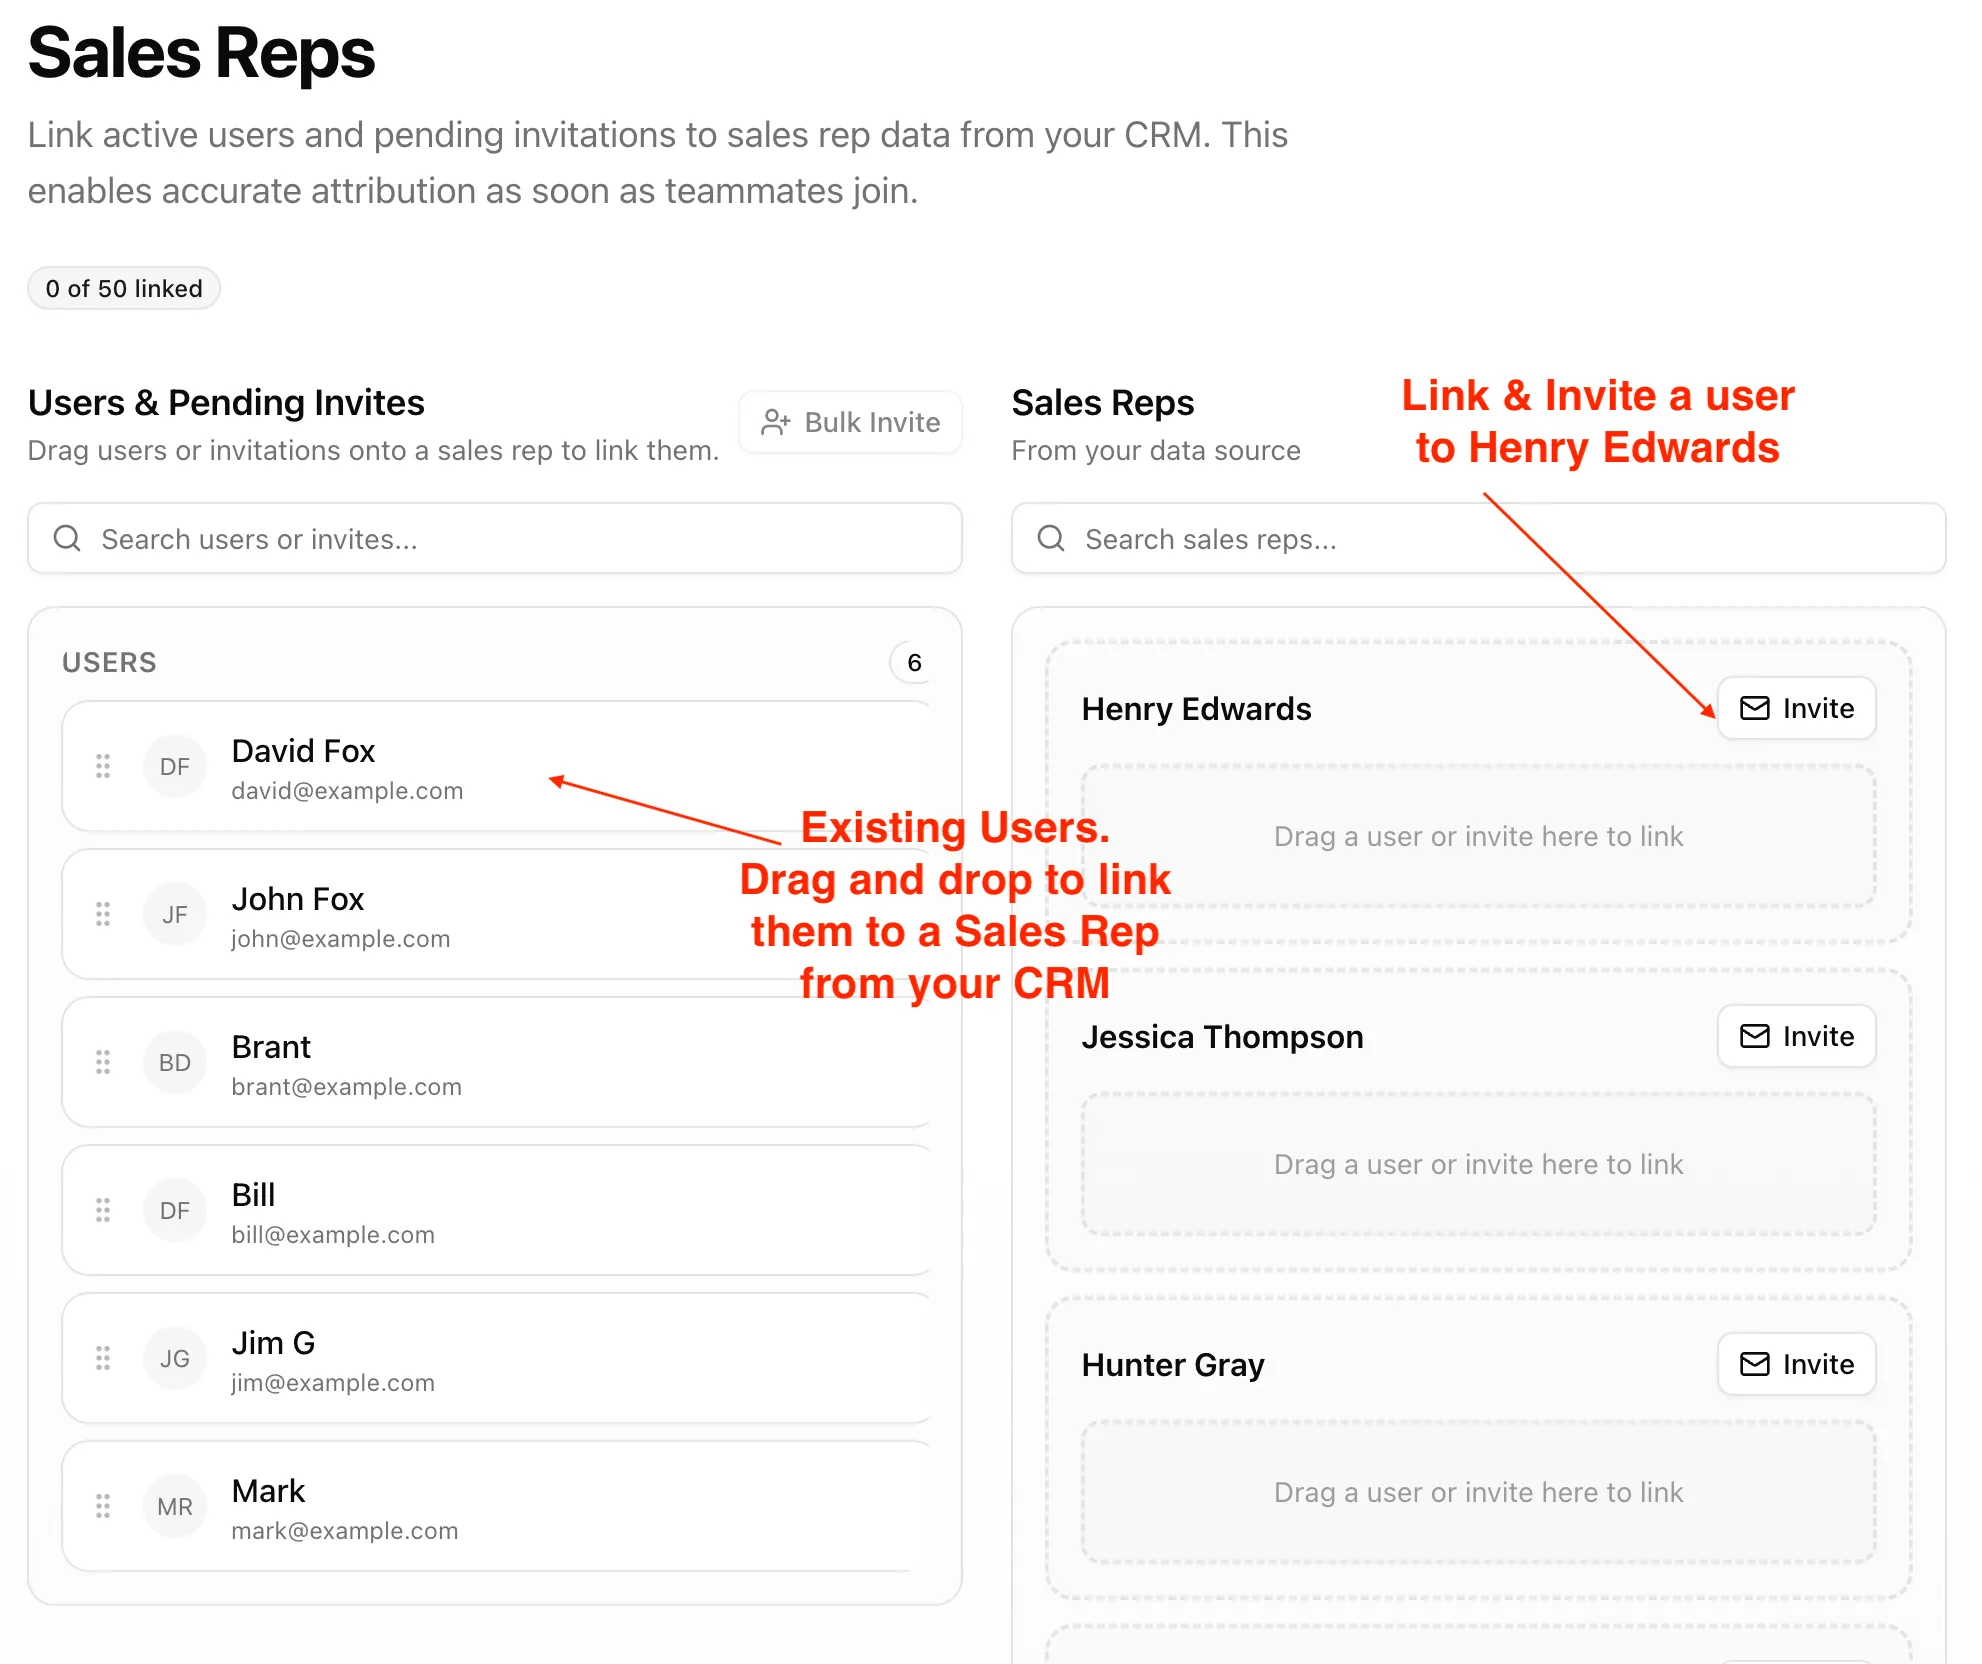
- Drag Users Onto Reps
Drag a user or pending invite from the left side onto the matching sales rep on the right. For example, if the Moneyball user is Sally Shells and the CRM sales rep record is Sally S. Shells, drag Sally’s Moneyball user onto Sally’s CRM rep record.
You may see old reps in this list. That is normal. Moneyball reads historical data, and historical data often includes people who have long since left the building, changed teams, or become legends spoken of only during annual planning.
- Invite From The Rep Card
If the person has not been invited yet, use the shortcut on the sales rep card.
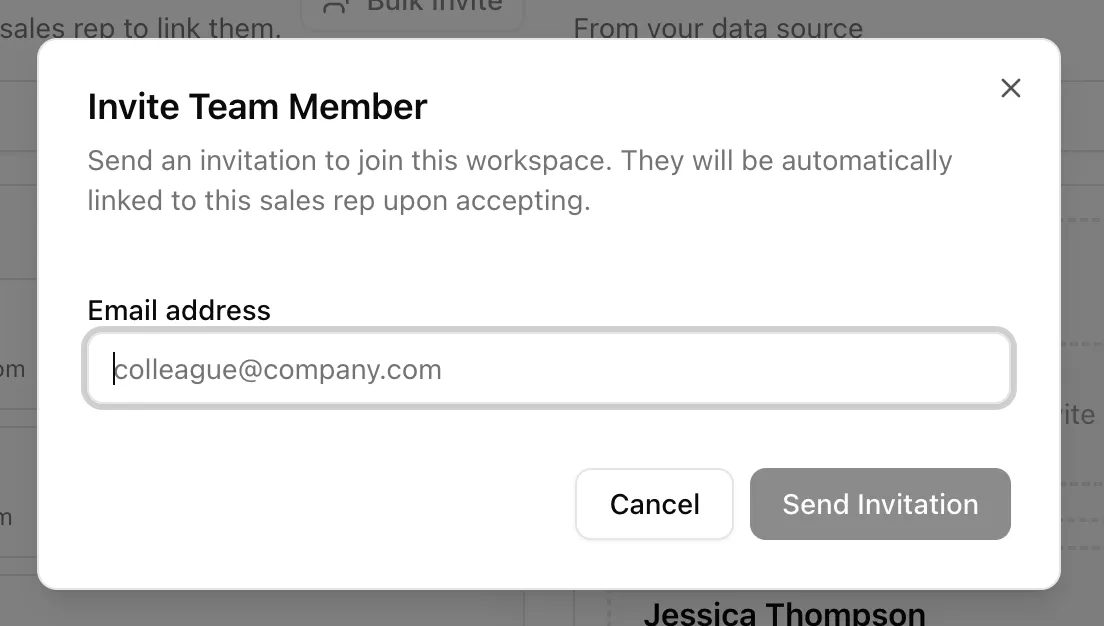
Click Invite next to the sales rep, enter the person’s email address, and send the invitation. When they accept, Moneyball automatically links that invited user to the selected sales rep record. That shortcut saves time when you are onboarding several reps at once.
Part VI
You Are Ready To Use Moneyball
That is the core setup.
You created the organization, connected the data source, mapped the data Moneyball needs, categorized what Moneyball found, invited the team, configured managers, and linked users to sales reps.
You can come back to Team later whenever someone joins, leaves, changes managers, or needs a different access level. Sales organizations move. Moneyball can move with them.
Next, we suggest fine-tuning the settings that make Moneyball tick — if you’d like.